HOW TO USE A KEURIG? GOOD TIPS AND GUIDES IN 2024.
In the fast-paced world we live in, convenience has become a key factor in our daily routines. For coffee lovers, nothing beats the ease and speed of brewing a perfect cup of coffee, and that’s where Keurig coffee makers come into play.
Keurig has revolutionized the way we enjoy our favorite morning brew, offering a simple and efficient method to indulge in a delightful cup of coffee at the press of a button.
If you’re new to the Keurig experience or looking to refine your brewing skills, you’ve come to the right place. In this comprehensive guide, we’ll walk you through the step-by-step process of How to Use a Keurig, ensuring that you can extract the full potential of your machine and create coffee shop-quality beverages in the comfort of your own home.
From understanding the basic components of a Keurig machine to selecting the perfect coffee pod and customizing your cup’s strength and size, we’ve got you covered. So, whether you’re a busy professional craving that morning pick-me-up or a coffee enthusiast eager to explore new flavors, let’s dive in and unlock the full potential of your Keurig coffee maker!

HOW TO USE A KEURIG?
1. WHAT IS A KEURIG?
A Keurig is a popular brand of single-serve coffee makers that has gained widespread popularity for its convenience, ease of use, and ability to brew a quick and consistent cup of coffee. Developed by Keurig Dr Pepper, Inc., the company was founded in the early 1990s, and its single-serve coffee brewing system has become a household name over the years.
The Keurig system is designed to simplify the coffee brewing process, making it accessible to anyone, regardless of their level of expertise in coffee preparation.
Instead of using traditional coffee grounds, a Keurig machine utilizes pre-packaged coffee pods known as “K-Cups.” These K-Cups are small, airtight containers filled with ground coffee beans and a filter, ensuring that each cup of coffee is fresh and consistent in taste.
The process of brewing coffee with a Keurig is straightforward: the user inserts a K-Cup into the machine, closes the lid, selects the desired cup size and brewing strength (if available on the model), and then presses a button to initiate the brewing process.
In a matter of seconds, hot water is forced through the K-Cup, extracting the flavors and aromas of the coffee and producing a single cup of freshly brewed coffee.
One of the significant advantages of using a Keurig is the versatility it offers. Apart from traditional coffee, K-Cups are available in a wide range of flavors, including tea, hot chocolate, specialty coffee blends, and even iced beverages, catering to various preferences and tastes.
Thanks to its simplicity and speed, the Keurig has become a staple in offices, homes, and commercial settings, providing a convenient solution for people who desire a quick and delicious cup of coffee without the need for complex coffee-making equipment or brewing skills.
However, despite its convenience, some coffee enthusiasts debate the environmental impact of the single-use K-Cups, leading to the development of recyclable and reusable options.
Overall, the Keurig coffee maker has become an iconic and influential product, changing the way countless individuals enjoy their coffee and other hot beverages, and revolutionizing the world of at-home coffee brewing.
You can see How to Use a Keurig as below.
2. WHAT ARE BENEFITS OF A KEURIG?
The Keurig coffee maker offers several benefits that have contributed to its widespread popularity and appeal among coffee enthusiasts and casual coffee drinkers alike. Here are some of the key benefits of using a Keurig:
- Convenience: One of the primary advantages of a Keurig is its unparalleled convenience. With just the press of a button, you can brew a fresh cup of coffee in a matter of seconds. There’s no need to measure coffee grounds, deal with filters, or wait for the coffee to brew in a traditional drip coffee maker. This makes it perfect for busy individuals who are always on the go or for office settings where multiple people have different coffee preferences.
- Variety: Keurig machines offer a vast array of coffee flavors and beverage options through their extensive selection of K-Cups. Whether you prefer a classic dark roast, a flavored coffee, herbal tea, hot cocoa, or even iced beverages, there’s a K-Cup available to suit your taste buds. The variety ensures that Keurig users can explore different flavors and experiment with new beverages easily.
- Consistency: Keurig machines are designed to deliver consistent results with each cup of coffee. The use of pre-measured K-Cups ensures that you get the same flavor profile and strength every time you brew, eliminating the risk of human error in coffee preparation.
- Speed: If you’re in a hurry and need your coffee fix fast, the Keurig is the perfect solution. The rapid brewing process means you can have a cup of hot coffee in under a minute, which is significantly faster than most traditional coffee brewing methods.
- Minimal Cleanup: Cleaning up after brewing coffee can be a hassle, but with a Keurig, there’s minimal mess to deal with. Since the coffee grounds are contained in the K-Cup, there are no filters to clean or wet coffee grounds to dispose of, making cleanup quick and easy.
- Customization: Many Keurig models come with adjustable settings that allow you to customize the strength and size of your cup of coffee. This feature ensures that you can tailor your brew according to your personal preferences.
- Single-Serve Portion Control: With Keurig’s single-serve system, you can avoid wasting coffee. You brew only as much as you need, reducing the likelihood of pouring excess coffee down the drain.
- Ideal for Small Spaces: Keurig machines are compact and take up minimal counter space, making them a perfect fit for apartments, dorm rooms, and small kitchens.
While the Keurig offers undeniable convenience and a wide range of benefits, it’s essential to consider factors like environmental impact when using single-use K-Cups. To address this concern, Keurig has introduced recyclable and reusable K-Cup options, making the system more eco-friendly for those who are conscious of their environmental footprint.
You can refer How to Use a Keurig as below.
3. HOW MANY TYPES OF KEURIG?
Keurig offers a diverse range of coffee makers with different features and capabilities to suit various preferences and needs. While the specific models and offerings may change over time, here are some common types of Keurig machines that were available:
- Keurig Classic Series: These are the basic and most affordable Keurig models, offering a straightforward brewing process with single-button operation. They come in different sizes and capacities to accommodate varying cup volumes.
- Keurig Plus Series: The Plus Series models come with additional features such as strength control, temperature control, and programmable settings. Some models in this series may have a larger water reservoir and the ability to brew carafes in addition to single cups.
- Keurig K-Cafe: The K-Cafe models are designed for coffee enthusiasts who enjoy specialty coffee beverages. They have a built-in milk frother, allowing you to make lattes and cappuccinos in addition to regular coffee.
- Keurig K-Select: The K-Select series emphasizes simplicity and ease of use, often featuring a strong brew option to cater to those who prefer a bolder cup of coffee.
- Keurig K-Elite: The K-Elite models typically combine premium design with features like temperature adjustment, multiple cup sizes, and iced beverage settings.
- Keurig K-Duo: The K-Duo machines are a combination of a single-serve Keurig and a traditional drip coffee maker. They offer the convenience of K-Cups for single cups and a carafe option for brewing larger quantities.
- Keurig K-Mini: The K-Mini series is compact and ideal for small spaces, such as dorm rooms or offices with limited counter space.
- Keurig OfficePro: These are designed specifically for office settings, with larger water reservoirs and durable construction to handle higher brewing volumes.
It’s worth noting that Keurig frequently updates and expands its product line to meet consumer demands and technological advancements. As a result, new models may have been introduced since my last update. To get the most current information on the types of Keurig machines available, I recommend visiting the official Keurig website or checking with authorized retailers.
Please see How to Use a Keurig as below.
4. WHAT SHOULD WE CONSIDER BEFORE BUYING KEURIG?
Before purchasing a Keurig coffee maker, there are several important factors to consider ensuring you choose the right model that best suits your needs and preferences. Here are some key considerations:
- Brewing Capacity: Determine how many cups of coffee you typically brew in a single session. Keurig machines come in various sizes, with different water reservoir capacities. If you often entertain guests or have a larger household, you might want to consider a model with a larger water reservoir to minimize the need for frequent refilling.
- Cup Size Options: Check if the Keurig model you’re interested in offers multiple cup size options. Some models have adjustable brew sizes, allowing you to select the cup size that suits your preference.
- Strength Control: If you enjoy customizing the strength of your coffee, look for a Keurig with a strength control feature. This allows you to adjust the brew intensity to your liking.
- Beverage Variety: Consider the types of beverages you want to brew. While all Keurig machines can brew coffee, some models offer additional features for making specialty drinks like lattes and cappuccinos. If you prefer a wide range of beverage options, a Keurig with a milk frother or hot water dispenser might be a good choice.
- Programmable Settings: Certain Keurig models come with programmable features, such as auto on/off timers and temperature control. These options allow you to have your coffee ready at specific times and adjust the brewing temperature according to your preference.
- Maintenance and Cleaning: Check the ease of maintenance and cleaning for the model you are considering. Some machines have removable parts that are dishwasher safe, making cleaning hassle-free.
- Space and Aesthetics: Consider the available counter space in your kitchen and choose a Keurig that fits comfortably in the designated area. Additionally, think about the design and aesthetics that match your kitchen decor.
- Budget: Keurig machines vary in price, so determine your budget range before making a decision. Keep in mind that some of the more advanced models with additional features may come with a higher price tag.
- Sustainability: If environmental impact is a concern for you, consider Keurig models that offer reusable K-Cup options or are compatible with recyclable K-Cups to reduce waste.
- Reviews and Ratings: Before purchasing, read customer reviews and ratings to gain insights into the real-world experiences of other users with the model you’re interested in.
By considering these factors, you can make an informed decision and find a Keurig coffee maker that aligns with your preferences, lifestyle, and budget, ultimately enhancing your coffee brewing experience at home or in the office.
Please refer How to Use a Keurig as below.
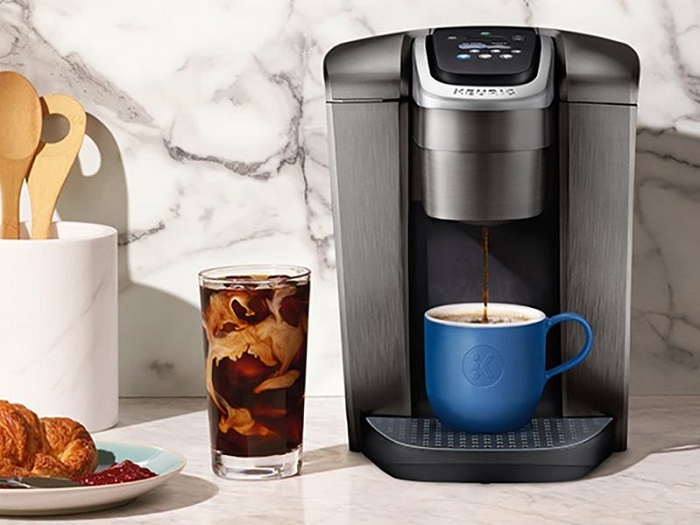
5. STEPS ON HOW TO USE A KEURIG?
Using a Keurig coffee maker is a straightforward process, but it’s essential to follow these steps carefully to ensure you brew the perfect cup of coffee. Here’s a step-by-step guide on how to use a Keurig:
- Preparation:
- Plug in the Keurig and make sure it has enough water in the water reservoir for your desired cup size.
- Inserting the K-Cup:
- Lift the handle on the front of the Keurig to open the K-Cup holder.
- Insert a K-Cup of your chosen coffee flavor into the holder. The foil lid of the K-Cup should be facing up, and the flat bottom should be facing down.
- Closing the K-Cup Holder:
- Lower the handle back down to close the K-Cup holder securely.
- Selecting Cup Size (if applicable):
- If your Keurig model offers different cup size options, select your preferred cup size. Some common options include 6 oz, 8 oz, and 10 oz.
- Optional Strength Control (if applicable):
- If your Keurig model has a strength control feature, you may have the option to choose a stronger or milder brew. Adjust the strength setting as desired.
- Brewing the Coffee:
- Place a coffee mug or cup on the drip tray beneath the K-Cup holder.
- Press the “Brew” or “Start” button to initiate the brewing process.
- The Keurig will heat the water and force it through the K-Cup to brew your coffee.
- Wait for Brewing to Complete:
- Wait for the brewing process to finish. The time it takes to brew a cup of coffee will vary depending on the selected cup size and the specific Keurig model.
- Remove the K-Cup:
- Once the brewing process is complete, lift the handle again to open the K-Cup holder.
- Carefully remove the used K-Cup and dispose of it appropriately. Some K-Cups are recyclable, so check for recycling instructions on the packaging.
- Enjoy Your Coffee:
- Stir your freshly brewed coffee, add any desired cream or sweetener, and enjoy your hot cup of coffee!
- Maintaining Your Keurig:
- Regularly clean and descale your Keurig to keep it functioning optimally and maintain the quality of your coffee. Refer to the user manual for specific cleaning instructions for your model.
Remember, the specific steps may vary slightly depending on the Keurig model you have, but the general process remains consistent across most Keurig machines. Always refer to the user manual provided with your Keurig for any model-specific instructions or safety precautions.
There are How to Use a Keurig as above.
6. STEPS ON HOW TO USE KEURIG MINI?
Using a Keurig Mini (specifically, the Keurig K-Mini) is quite similar to other Keurig models, but it’s designed to be compact and user-friendly. Here are the steps on how to use a Keurig Mini:
- Preparation:
- Place the Keurig Mini on a flat and sturdy surface near an electrical outlet.
- Remove any packaging materials and ensure all components are in place.
- Adding Water:
- Lift the water reservoir lid located on the top of the Keurig Mini.
- Fill the reservoir with fresh, cold water up to your desired cup size. The Keurig Mini’s water reservoir is typically smaller than other models, so it may not hold as much water.
- Powering On the Keurig Mini:
- Connect the power cord to the Keurig Mini and plug it into a power outlet.
- The power button is usually located on the front or side of the machine. Press the power button to turn on the Keurig Mini. The machine will start heating the water.
- Preheating:
- The Keurig Mini will take a few minutes to preheat. During this time, the power indicator light will be on and might blink.
- Inserting the K-Cup:
- Lift the handle on the front of the Keurig Mini to open the K-Cup holder.
- Insert a K-Cup of your choice into the holder, with the foil lid facing up and the flat bottom facing down.
- Closing the K-Cup Holder:
- Lower the handle to close the K-Cup holder securely.
- Brewing the Coffee:
- Place a coffee mug on the drip tray beneath the K-Cup holder to catch the brewed coffee.
- Once the Keurig Mini is preheated, the power indicator light will become solid. Choose your preferred cup size by pressing the brew button (the cup size options may be limited on some Keurig Mini models).
- The Keurig Mini will start brewing your coffee. The brewing process will stop automatically once it completes.
- Removing the K-Cup:
- After the brewing process is finished, lift the handle to open the K-Cup holder.
- Carefully remove the used K-Cup and dispose of it appropriately.
- Enjoy Your Coffee:
- Stir your freshly brewed coffee, add any desired cream or sweetener, and enjoy!
- Powering Off the Keurig Mini:
- When you’re finished using the Keurig Mini, press the power button again to turn it off. The power indicator light will turn off.
- Maintaining Your Keurig Mini:
- Regularly clean and descale your Keurig Mini as per the instructions provided in the user manual to keep it in good working condition.
Remember to always consult the user manual that comes with your Keurig Mini for any specific instructions or safety precautions unique to your model.
We introduce How to Use a Keurig as above.
7. HOW TO CLEAN A KEURIG?
Cleaning your Keurig regularly is essential to maintain its performance, ensure the quality of your coffee, and prolong the life of the machine. Here’s a step-by-step guide on how to clean a Keurig:
Regular Daily Cleaning:
- Power Off and Unplug: Before cleaning, make sure the Keurig is turned off and unplugged from the power source to ensure safety.
- Remove and Clean Drip Tray and Water Reservoir: Take out the drip tray and water reservoir from the Keurig. Wash them with warm, soapy water, rinse thoroughly, and let them air dry.
- Clean External Surfaces: Wipe the exterior surfaces of the Keurig with a damp cloth or sponge to remove any spills or coffee residue.
Weekly Cleaning:
- Clean K-Cup Holder: Lift the handle to open the K-Cup holder and remove the K-Cup holder assembly if possible (some models may not allow this). Rinse the K-Cup holder and the funnel that punctures the K-Cup under running water. Gently clean any coffee grounds that may have accumulated.
- Descale the Keurig:
- Descaling is crucial to remove mineral deposits (calcium and scale) that can build up inside the machine over time. These deposits can affect the taste of your coffee and reduce the efficiency of the Keurig.
- Prepare a descaling solution by mixing equal parts of white vinegar and water. The volume of the solution should be enough to fill the water reservoir.
- Pour the descaling solution into the water reservoir.
- Place a large mug on the drip tray to catch the descaling solution.
- Run a descaling cycle:
- For Keurig Classic Series: Start the brewing cycle without inserting a K-Cup. Allow the machine to dispense the descaling solution into the mug.
- For Keurig 2.0 or other models with descaling cycles: Follow the specific descaling instructions provided in your user manual.
- Discard the contents in the mug and rinse it.
- Refill the water reservoir with clean water and run a few brewing cycles without a K-Cup to flush out any remaining descaling solution.
- Rinse and clean the water reservoir thoroughly to remove any vinegar odor.
- If you still detect a vinegar smell or taste, repeat the rinse cycle until it is gone.
- Clean Water Reservoir and Lid: Remove the water reservoir lid and thoroughly clean it with warm, soapy water. Rinse it well and let it air dry. Wipe the interior of the water reservoir with a damp cloth to remove any residue.
Monthly Maintenance:
- Inspect and Clean the Needle (Keurig Classic Series): Remove the K-Cup holder assembly, and you’ll find a needle that punctures the K-Cup. Use a paper clip or the Keurig maintenance accessory (if provided) to clear any clogs or debris from the needle.
- Inspect Water Filter (if applicable): If your Keurig model has a water filter, replace it according to the manufacturer’s recommendations (usually every two months or after 60 tank refills).
- Clean and Reassemble: Once all the parts are cleaned and dried, reassemble the Keurig, including the drip tray and water reservoir.
Regular cleaning and maintenance will keep your Keurig running smoothly and ensure that you continue to enjoy delicious coffee with every brew. As always, refer to your Keurig’s user manual for any specific cleaning and maintenance instructions for your model.
You can see How to Use a Keurig as above.
8. HOW TO CHANGE KEURIG FILTER?
If your Keurig model is equipped with a water filter, changing the filter is a straightforward process. Follow these steps to replace the Keurig filter:
- Prepare the New Filter:
- Purchase the appropriate Keurig water filter cartridge or replacement filter. Ensure it is compatible with your specific Keurig model.
- Soak the Filter (If Required):
- Some Keurig filters come with a pre-soak requirement to remove any loose carbon particles. If your filter requires soaking, follow the instructions provided on the packaging. Typically, soaking it in cold water for a few minutes is sufficient.
- Remove the Old Filter (if applicable):
- If there is already a filter in the water reservoir, remove it by grasping the handle or tab of the old filter and gently pulling it straight up and out.
- Rinse the Water Reservoir:
- Rinse the water reservoir thoroughly with cold water to remove any debris or remaining residue from the old filter.
- Prepare the New Filter:
- Take the new filter out of its packaging. If it requires pre-soaking, make sure it has been soaked and rinsed as per the instructions.
- Install the New Filter:
- Insert the new water filter into the designated slot or compartment in the water reservoir. Some Keurig models have a filter holder specifically designed for the filter cartridge.
- Properly Position the Filter:
- Ensure the filter is placed correctly, with the flat side facing downward and the handle or tab facing upward for easy removal in the future.
- Align and Set the Filter Holder (if applicable):
- If your Keurig model includes a filter holder, ensure it is properly aligned and set in place over the filter.
- Flush the Filter:
- Fill the water reservoir with cold water. You may notice some initial carbon dust or particles in the water as the filter is flushed. This is normal and should subside after a few rinses.
- Prepare the Keurig for Brewing:
- Reassemble any removed components, such as the water reservoir lid and drip tray, making sure they are securely in place.
- Power on your Keurig and wait for it to complete the initial setup process before brewing any coffee.
Filter Replacement Schedule:
- The recommended replacement schedule for Keurig water filters is generally every two months or after 60 tank refills. However, the replacement frequency may vary based on your water quality and usage.
Note: If your Keurig model does not have a water filter option or you choose not to use a filter, you can still brew coffee without it. The water filter is designed to improve the taste and quality of your coffee by reducing impurities, but it is not necessary for the machine’s basic functioning.
Above is information about How to Use a Keurig. Now, let’s see some tips and guides on How to Use a Keurig as below.
TIPS AND GUIDES ON HOW TO USE A KEURIG.

1. SOME TIPS ON HOW TO USE A KEURIG.
Here are some helpful tips to enhance your Keurig experience and ensure you get the best results when using a Keurig coffee maker:
- Use Fresh Water: Always use fresh, cold water to fill the water reservoir. Using stale or warm water can affect the taste of your coffee.
- Preheat the Keurig: Allow your Keurig to preheat before brewing your coffee. This ensures that the water is at the optimal temperature for brewing.
- Run a Water-only Brew Cycle: If you haven’t used your Keurig in a while or after descaling, run a water-only brew cycle without a K-Cup to flush out any remaining descaling solution or to clear the water lines.
- Use Quality K-Cups: Choose high-quality K-Cups from reputable coffee brands to ensure a delicious cup of coffee with every brew.
- Experiment with Cup Sizes: If your Keurig model offers multiple cup size options, try different sizes to find the one that suits your taste preferences best.
- Adjust Brew Strength (if available): If your Keurig has a strength control feature, experiment with different settings to customize the strength of your coffee.
- Keep the Machine Clean: Regularly clean the external surfaces, drip tray, and water reservoir to maintain cleanliness and hygiene.
- Descale the Keurig: Perform regular descaling to remove mineral deposits from the internal components, which can affect the taste and performance of your coffee maker.
- Purge the Water Line: If you haven’t used your Keurig for an extended period, run a water-only brew cycle to purge the water line and ensure fresh water is used for brewing.
- Use the Right Mug Size: Ensure that your coffee mug or cup fits comfortably on the drip tray to avoid spills and splashes.
- Prime the Keurig (for K-Cafe or K-Latte): If your Keurig has a milk frother, run a frothing cycle with water before using milk to prime the frother and ensure optimal performance.
- Consider Using Reusable K-Cups: Reduce waste and save money by using reusable K-Cups, which allow you to use your preferred coffee grounds instead of single-use pods.
- Try Different Beverages: Explore the variety of K-Cups available, including flavored coffee, tea, hot chocolate, and specialty beverages, to discover new flavors and options.
- Keep the Area Well Ventilated: If your Keurig produces steam during the brewing process, ensure that the area is well ventilated to prevent any condensation buildup.
- Read the User Manual: Familiarize yourself with the specific features and functions of your Keurig model by reading the user manual thoroughly.
By following these tips, you can make the most of your Keurig coffee maker and enjoy delicious coffee or other hot beverages tailored to your preferences.
You can refer How to Use a Keurig as above.
2. HOW TO MAKE ESPRESSO WITH KEURIG?
While Keurig coffee makers are designed for brewing regular coffee and not true espresso, you can create a coffee that resembles the strength and intensity of espresso using your Keurig machine. Here’s a method to make a coffee similar to espresso with a Keurig:
Ingredients:
- Dark roast or extra bold K-Cup (preferably a strong coffee blend)
- Water
Instructions:
- Preparation:
- Ensure your Keurig is plugged in, powered on, and the water reservoir is filled with fresh, cold water.
- Use an Extra Bold or Dark Roast K-Cup:
- Choose an extra bold or dark roast K-Cup for a stronger and more intense coffee flavor. The higher coffee-to-water ratio in these K-Cups will result in a brew more similar to espresso.
- Preheat the Keurig:
- Allow your Keurig to preheat before brewing. This ensures that the water is at the right temperature for optimal extraction.
- Brew the Coffee:
- Insert the selected K-Cup into the K-Cup holder.
- Position a small espresso cup or a demitasse cup (about 2 to 3 ounces) on the drip tray to catch the coffee.
- Choose the Smallest Cup Size:
- If your Keurig model offers multiple cup size options, select the smallest cup size available to achieve a more concentrated coffee.
- Brew the Coffee:
- Press the brew button to start the brewing process. The smaller cup size and the dark roast K-Cup will result in a more intense and concentrated coffee, resembling the characteristics of espresso.
- Adjust Strength (Optional):
- If your Keurig model has a strength control feature, you can experiment with different settings to adjust the intensity of the coffee to your liking.
- Serve and Enjoy:
- Once the brewing process is complete, your “espresso-like” coffee is ready. Serve it immediately, and you can enjoy it as is or use it as a base for other espresso-based drinks like lattes or Americanos.
Please keep in mind that while this method can produce a coffee with a stronger and more concentrated taste, it may not replicate the exact characteristics of traditional espresso brewed using an espresso machine.
The pressure and extraction process in a dedicated espresso machine are different from what a Keurig can achieve. However, this method can be a convenient and satisfying alternative for a quick and intense cup of coffee using your Keurig.
Please see How to Use a Keurig as above.
3. HOW TO MAKE A LATTE WITH A KEURIG?
To make a latte with a Keurig, you’ll need to use the milk frothing method, as Keurig machines do not have built-in steam wands like traditional espresso machines. Here’s a step-by-step guide on how to make a latte using a Keurig:
Ingredients:
- Dark roast or espresso K-Cup
- Milk (whole milk or any milk of your choice)
- Sweetener or flavoring (optional)
- Whipped cream (optional, for topping)
Equipment:
- Keurig coffee maker
- Milk frother (you can use a handheld frother or a milk frothing machine)
Instructions:
- Preparation:
- Ensure your Keurig is plugged in, powered on, and the water reservoir is filled with fresh, cold water.
- Fill your milk frother with the amount of milk you’d like for your latte. It’s best to use cold milk for frothing.
- Brew the Coffee:
- Insert a dark roast or espresso K-Cup into the Keurig machine. You can use any strong coffee blend that you prefer for your latte.
- Position a large coffee mug on the drip tray to catch the brewed coffee.
- Brew the Coffee:
- Select your desired cup size on the Keurig, typically a larger cup size (e.g., 8 or 10 ounces) to make room for the milk and froth.
- Froth the Milk:
- While the coffee is brewing, use your milk frother to froth the milk. Follow the instructions for your specific frother. If you don’t have a frother, you can heat the milk in a microwave-safe container and froth it using a handheld whisk or a blender. Froth the milk until it has a creamy and velvety texture.
- Combine Coffee and Frothed Milk:
- Once the coffee is brewed, pour the frothed milk into the coffee mug, holding back the foam with a spoon.
- Then, pour the coffee over the milk, and gently spoon the frothed milk over the top of the latte.
- Add Sweetener or Flavoring (Optional):
- If desired, add sweetener (e.g., sugar, honey, or flavored syrup) to the latte. Stir well to incorporate the sweetener.
- Top with Whipped Cream (Optional):
- For an extra indulgent touch, you can add a dollop of whipped cream on top of the latte.
- Serve and Enjoy:
- Your homemade latte is ready! Serve it hot and enjoy the rich and creamy goodness.
By following these steps and using a milk frother, you can create a delicious and creamy latte with your Keurig. Feel free to customize your latte by adding different syrups or spices like cinnamon or cocoa powder for added flavor variations.
Please refer How to Use a Keurig as above.
4. HOW TO MAKE CAPPUCCINO WITH KEURIG?
Making a cappuccino with a Keurig follows a similar process to making a latte, but with a higher ratio of frothed milk to coffee. As with the latte, Keurig machines do not have built-in steam wands, so you’ll need a milk frother to achieve the frothy milk for the cappuccino. Here’s how to make a cappuccino using a Keurig:
Ingredients:
- Dark roast or espresso K-Cup
- Milk (whole milk or any milk of your choice)
- Sweetener or flavoring (optional)
- Whipped cream (optional, for topping)
- Cocoa powder or cinnamon (optional, for garnish)
Equipment:
- Keurig coffee maker
- Milk frother (handheld frother or milk frothing machine)
Instructions:
- Preparation:
- Ensure your Keurig is plugged in, powered on, and the water reservoir is filled with fresh, cold water.
- Fill your milk frother with the amount of milk you’d like for your cappuccino. Use cold milk for best results.
- Brew the Coffee:
- Insert a dark roast or espresso K-Cup into the Keurig machine. Choose a strong coffee blend that suits your taste preference for the cappuccino.
- Position a large coffee mug on the drip tray to catch the brewed coffee.
- Brew the Coffee:
- Select your desired cup size on the Keurig, usually a smaller cup size (e.g., 4 or 6 ounces) to make room for the frothed milk.
- Froth the Milk:
- While the coffee is brewing, use your milk frother to froth the milk. Follow the instructions for your specific frother. Froth the milk until it has a thick and velvety foam.
- Combine Coffee and Frothed Milk:
- Once the coffee is brewed, pour the frothed milk into the coffee mug, holding back the foam with a spoon.
- Then, pour the coffee over the milk, and gently spoon the frothed milk foam over the top of the cappuccino.
- Add Sweetener or Flavoring (Optional):
- If desired, add sweetener (e.g., sugar, honey, or flavored syrup) to the cappuccino. Stir well to incorporate the sweetener.
- Top with Whipped Cream and Garnish (Optional):
- For an indulgent touch, you can add a dollop of whipped cream on top of the cappuccino.
- Optionally, dust the top of the cappuccino with cocoa powder or cinnamon for added flavor and presentation.
- Serve and Enjoy:
- Your homemade cappuccino is ready! Sip and savor the creamy and frothy goodness.
By following these steps and using a milk frother, you can enjoy a delicious and satisfying cappuccino made with your Keurig. Remember that cappuccinos typically have a higher foam-to-milk ratio than lattes, resulting in a stronger and more pronounced coffee flavor with a rich, foamy texture.
There are How to Use a Keurig as above.
5. HOW TO USE GROUND COFFEE IN KEURIG?
Using ground coffee in a Keurig machine requires a special accessory called a reusable K-Cup or My K-Cup, which allows you to brew with your own coffee grounds instead of using pre-packaged K-Cups. Here’s how to use ground coffee in a Keurig using a reusable K-Cup:
Ingredients and Equipment:
- Ground coffee of your choice
- Reusable K-Cup (My K-Cup)
- Coffee grinder (if needed)
Instructions:
- Choose Your Coffee and Grind (if needed):
- Select the ground coffee of your choice. If you have whole coffee beans, use a coffee grinder to grind them to a medium-fine consistency, similar to the texture of table salt.
- Prepare the Reusable K-Cup (My K-Cup):
- Open the lid of the reusable K-Cup and fill it with the desired amount of ground coffee. The recommended amount is usually one tablespoon per 6-ounce cup, but you can adjust it based on your preferred strength.
- Pack the Coffee:
- Gently tap the reusable K-Cup on the counter to level and settle the coffee grounds. Do not pack the grounds too tightly, as it may affect the water flow during brewing.
- Close and Lock the Reusable K-Cup:
- Once the reusable K-Cup is filled with coffee, close the lid securely and lock it in place.
- Prepare the Keurig:
- Ensure your Keurig is plugged in and powered on.
- Lift the handle on the front of the Keurig to open the K-Cup holder.
- Insert the Reusable K-Cup:
- Insert the filled and locked reusable K-Cup into the K-Cup holder. Make sure it fits snugly and is properly aligned.
- Brew the Coffee:
- Place a coffee mug on the drip tray beneath the K-Cup holder to catch the brewed coffee.
- Select your desired cup size on the Keurig for the amount of coffee you want to brew.
- Start Brewing:
- Press the brew button to start the brewing process. The Keurig will pump hot water through the reusable K-Cup, extracting the coffee.
- Remove the Reusable K-Cup:
- After the brewing process is complete, carefully lift the handle to open the K-Cup holder and remove the used reusable K-Cup.
- Enjoy Your Coffee:
- Stir your freshly brewed coffee, add any desired cream or sweetener, and enjoy your cup of coffee brewed with your own ground coffee.
Using a reusable K-Cup allows you to enjoy a wide variety of coffee flavors using your preferred ground coffee beans, reducing waste from single-use K-Cups and providing more control over the strength and flavor of your brew. Remember to clean and rinse the reusable K-Cup after each use to ensure the best brewing results and to avoid any residue affecting the taste of future brews.
We introduce How to Use a Keurig as above.
6. HOW TO GET HOT WATER FROM KEURIG?
Getting hot water from a Keurig is a simple process, and you can use it to make tea, hot chocolate, or for any other hot water needs. Here’s how to get hot water from a Keurig:
Instructions:
- Prepare the Keurig:
- Ensure your Keurig is plugged in and powered on.
- Lift the handle on the front of the Keurig to open the K-Cup holder.
- Prepare the Mug or Cup:
- Place a mug or cup on the drip tray beneath the K-Cup holder to catch the hot water.
- Select Hot Water Option:
- If your Keurig model has a dedicated hot water option, look for a button or setting labeled “Hot Water” or “Hot Water Dispense.” Press this button to initiate the hot water dispensing process.
- Wait for Hot Water:
- The Keurig will heat the water to the appropriate temperature for hot water dispensing.
- Once the water is heated, it will start dispensing hot water into your mug or cup.
- Dispense Hot Water:
- If your Keurig model doesn’t have a dedicated hot water button, you can still get hot water by running a water-only brew cycle without inserting a K-Cup. To do this, close the K-Cup holder without adding a K-Cup, select your desired cup size for the amount of hot water you need, and press the brew button.
- Adjust Water Quantity:
- If your Keurig has multiple cup size options, you can choose the cup size that provides the amount of hot water you need.
- Stop Water Dispensing:
- Once you have enough hot water in your mug or cup, press the hot water button again (if applicable) or simply lift the handle on the Keurig to stop the water flow.
- Remove the Mug or Cup:
- Carefully lift the mug or cup from the drip tray once the hot water dispensing is complete.
- Enjoy Your Hot Water:
- Use the hot water for making tea, hot chocolate, instant soups, or any other hot beverages or recipes.
- Maintain the Keurig:
- After using the hot water function, remember to clean and maintain your Keurig as per the manufacturer’s recommendations to keep it in good working condition.
It’s important to note that the hot water from a Keurig is typically not boiling hot, but it is hot enough for most hot beverage preparations. Be cautious when handling hot water to avoid burns or scalds. Additionally, if you need a large quantity of hot water, you may need to dispense it in multiple batches to prevent overflow or spills.
You can see How to Use a Keurig as above.
7. HOW TO PERFORM NEEDLE MAINTENANCE ON KEURIG?
Performing needle maintenance on your Keurig is essential to keep the machine running smoothly and prevent any clogs or blockages in the needles that puncture the K-Cups. Regular maintenance helps ensure proper water flow and optimal brewing performance. Here’s how to perform needle maintenance on your Keurig:
Instructions:
- Power Off and Unplug:
- Before starting any maintenance, ensure your Keurig is powered off and unplugged from the power source to avoid any accidents.
- Remove the K-Cup Holder:
- Lift the handle on the front of the Keurig to open the K-Cup holder.
- If your Keurig model allows it, remove the entire K-Cup holder assembly from the Keurig. This will give you better access to the needles.
- Locate the Needles:
- Look inside the K-Cup holder or where it was positioned to locate the two needles that puncture the K-Cups. One is the upper needle, and the other is the lower needle.
- Inspect for Clogs or Debris:
- Check the needles for any clogs or debris that may be affecting the water flow. Coffee grounds, tea leaves, and other particles can sometimes accumulate in the needles and cause issues.
- Clean the Needles:
- Use a paper clip or the Keurig maintenance accessory (if provided with your machine) to carefully clear any clogs or debris from the needles.
- Insert the paper clip into the needle opening and gently move it up and down to dislodge any blockages. Be gentle to avoid damaging the needles.
- Clean the K-Cup Holder:
- While the K-Cup holder is removed, wash it with warm, soapy water and rinse it thoroughly to remove any coffee residue or grounds. Dry it completely before reassembling.
- Reassemble the K-Cup Holder:
- Once the K-Cup holder is clean and dry, reassemble it back into the Keurig. Make sure it fits securely in place.
- Clean the Exterior Surfaces:
- Use a damp cloth or sponge to clean the exterior surfaces of the Keurig to remove any spills or coffee residue.
- Power On and Run Water-Only Brew Cycle:
- Plug in the Keurig and power it on.
- Without inserting a K-Cup, run a water-only brew cycle to flush out any remaining debris from the needles.
- Perform Regular Maintenance:
- Repeat this needle maintenance process periodically, depending on your usage frequency and the water quality in your area. Regular maintenance will help keep your Keurig in optimal condition and ensure a great brewing experience.
Remember to always follow the maintenance and cleaning recommendations provided in your Keurig’s user manual. Performing needle maintenance and regular cleaning will keep your Keurig functioning at its best and extend its lifespan.
You can refer How to Use a Keurig as above.
8. HOW IS KEURIG DIFFERENT FROM INSTANT COFFEE?
Keurig and instant coffee are two different methods of preparing coffee, each with its own characteristics and advantages. Here are the main differences between Keurig and instant coffee:
- Brewing Process:
- Keurig: Keurig is a single-serve coffee maker that uses pre-packaged coffee pods called K-Cups. The machine brews coffee by pumping hot water through the K-Cup, extracting the coffee’s flavors and aromas.
- Instant Coffee: Instant coffee is a type of coffee that has been brewed, roasted, and then freeze-dried or spray-dried to turn it into a soluble powder. To prepare instant coffee, you simply need to add hot water and stir.
- Quality and Flavor:
- Keurig: Keurig coffee is generally fresher and offers a wider variety of coffee flavors and blends since it uses freshly ground coffee in the K-Cups. This results in a more flavorful and aromatic cup of coffee.
- Instant Coffee: Instant coffee, while convenient, is known for having a milder and less complex flavor compared to freshly brewed coffee. Some coffee enthusiasts may find it lacks the full-bodied taste and aroma of freshly brewed coffee.
- Convenience:
- Keurig: Keurig machines offer convenience and speed, especially for single servings. With a Keurig, you can have a freshly brewed cup of coffee in a matter of minutes without the need for complex preparation.
- Instant Coffee: Instant coffee is perhaps the most convenient way to make coffee. You can have a cup of coffee ready instantly by simply adding hot water to the coffee powder. It is an ideal option for those who want a quick and straightforward coffee-making process.
- Customization:
- Keurig: With Keurig, you can customize your coffee by choosing from a wide range of coffee flavors, blends, and roasts available in K-Cups. Some Keurig machines also offer strength control settings to adjust the coffee’s intensity.
- Instant Coffee: Instant coffee offers less customization since it comes pre-packaged as a single type of coffee. You can add milk, creamer, or sweetener to adjust the taste, but the coffee flavor itself remains the same.
- Waste:
- Keurig: Keurig machines produce waste in the form of single-use K-Cups, which can be a concern for some users concerned about environmental impact. However, some Keurig models have reusable K-Cups that can reduce waste.
- Instant Coffee: Instant coffee usually comes in recyclable or compostable packaging, which generates less waste compared to single-use K-Cups.
In summary, Keurig offers a fresher and more flavorful coffee experience with the convenience of single-serve brewing and a wide range of coffee options. On the other hand, instant coffee provides unmatched convenience and simplicity, making it a popular choice for those looking for a quick and easy coffee fix.
The choice between Keurig and instant coffee ultimately depends on your preferences, time constraints, and taste preferences.
Please see How to Use a Keurig as above.
9. COMMON MISTAKES ON HOW TO USE A KEURIG.
Using a Keurig coffee maker is generally straightforward, but some common mistakes can affect the quality of your coffee or the performance of the machine. Here are some common mistakes to avoid on how to use a Keurig:
- Using the Wrong Cup Size: Make sure to select the appropriate cup size on the Keurig that matches the amount of coffee you want. Using a larger cup size than necessary can result in weak and diluted coffee.
- Not Preheating the Keurig: It’s essential to allow the Keurig to preheat before brewing your coffee. Preheating ensures that the water is at the correct temperature for optimal extraction.
- Skipping Regular Cleaning and Maintenance: Neglecting regular cleaning and maintenance can lead to clogs, mold, or bacteria buildup in the machine, affecting the taste of your coffee and the performance of the Keurig.
- Using Stale or Warm Water: Always use fresh, cold water to fill the water reservoir. Stale or warm water can negatively impact the taste of your coffee.
- Ignoring Descale Warnings: Ignoring the descale warning and not descaling the Keurig when needed can lead to mineral buildup inside the machine, affecting the taste of your coffee and potentially damaging the Keurig.
- Overfilling the Water Reservoir: Be sure to fill the water reservoir to the appropriate level and avoid overfilling it, as this can lead to spillage and mess during brewing.
- Using the Wrong K-Cup: Ensure you are using K-Cups compatible with your Keurig model. Using incompatible or damaged K-Cups can result in brewing issues.
- Not Removing Previous K-Cup: Always remove the used K-Cup from the K-Cup holder before inserting a new one. Leaving the old K-Cup in place can cause grounds to mix with your next cup.
- Skipping Water-Only Brew Cycle: If you haven’t used your Keurig for a while or after descaling, run a water-only brew cycle without a K-Cup to flush out any remaining descaling solution or to clear the water lines.
- Not Positioning the Mug Correctly: Ensure your mug or cup is correctly positioned on the drip tray to prevent spills or splashes during brewing.
- Using the Wrong Strength Setting (if available): If your Keurig has a strength control feature, adjust it to your preference. Using the wrong setting can result in coffee that is too weak or too strong for your taste.
By avoiding these common mistakes, you can ensure that your Keurig coffee maker performs optimally and consistently delivers a delicious cup of coffee every time you brew. Remember to also refer to your Keurig’s user manual for specific instructions and maintenance recommendations for your model.
Please refer How to Use a Keurig as above.
FAQS ABOUT HOW TO USE A KEURIG.

1. Question 1: How do I use a Keurig coffee maker to brew a cup of coffee?
A: To brew a cup of coffee with a Keurig, first, ensure the machine is plugged in and powered on. Lift the handle to open the K-Cup holder and insert a K-Cup of your choice. Position a coffee mug on the drip tray, select your desired cup size on the Keurig, and press the brew button.
The Keurig will pump hot water through the K-Cup, extracting the coffee’s flavors and delivering a freshly brewed cup of coffee.
2. Question 2: Can I use ground coffee with a Keurig machine?
A: Yes, you can use ground coffee with a Keurig machine by using a reusable K-Cup or My K-Cup. These accessories allow you to fill them with your preferred ground coffee and use it in the Keurig, providing more customization options for your coffee brewing.
There are How to Use a Keurig as above.
3. Question 3: How often should I clean my Keurig coffee maker?
A: It is recommended to clean your Keurig coffee maker regularly to maintain its performance and ensure the best-tasting coffee. Clean the external surfaces and removable parts like the water reservoir, drip tray, and K-Cup holder weekly. Additionally, descale the Keurig every three to six months, depending on your water hardness and usage frequency.
4. Question 4: My Keurig is displaying a “Prime” error message. What should I do?
A: The “Prime” error message indicates that the water in the Keurig is not flowing properly. To resolve this issue, ensure that the water reservoir is filled to the correct level, and there are no obstructions in the water lines. You may need to lift and lower the handle to reset the machine or perform a water-only brew cycle to clear any blockages.
We introduce How to Use a Keurig as above.
5. Question 5: How do I descale my Keurig coffee maker?
A: To descale your Keurig, first, ensure the water reservoir is empty. Mix a solution of equal parts white vinegar and water and fill the water reservoir with it. Place a large mug on the drip tray, and run a brew cycle without a K-Cup to dispense the vinegar solution.
Repeat this process until the reservoir is empty. Then, fill the reservoir with fresh water and run multiple water-only brew cycles to rinse out any vinegar residue.
6. Question 6: Can I use milk or hot water from my Keurig to make beverages other than coffee?
A: Yes, you can use hot water from your Keurig to make various beverages, such as tea, hot chocolate, instant soups, or even oatmeal. Some Keurig models may have a specific “Hot Water” button or setting for this purpose. Additionally, if your Keurig has a milk frother or steam function, you can use it to froth milk for lattes and cappuccinos.
You can see How to Use a Keurig as above.
CONLUSION.
In conclusion, using a Keurig coffee maker can provide a convenient and enjoyable coffee brewing experience. With its single-serve brewing system and a wide variety of K-Cup options, Keurig offers coffee lovers the flexibility to brew their favorite flavors and strengths with ease.
To ensure the best results and avoid common mistakes, it is essential to follow proper brewing techniques, maintain the machine regularly, and be mindful of the water quality used.
Whether you prefer a quick cup of coffee in the morning or want to explore various coffee flavors, Keurig can cater to your needs. Additionally, the ability to use ground coffee with a reusable K-Cup adds versatility to the brewing process, allowing for more customization and reducing waste.
By adhering to the tips, instructions, and maintenance guidelines provided, you can make the most of your Keurig and enjoy delicious cups of coffee or other hot beverages with every brew.
Embracing the ease and convenience of Keurig, coupled with proper care and attention, guarantees a delightful coffee experience right in the comfort of your home. Cheers to enjoying your perfectly brewed cup of coffee with your Keurig coffee maker!
Read more:
Top 8 Best Espresso Machine Under 200 Reviews in 2024